HTML5 WebSocket
WebSocket 是 HTML5 开始提供的一种在单个 TCP 连接上进行全双工通讯的协议。
WebSocket 使得客户端和服务器之间的数据交换变得更加简单,允许服务端主动向客户端推送数据。在 WebSocket API 中,浏览器和服务器只需要完成一次握手,两者之间就直接可以创建持久性的连接,并进行双向数据传输。
spingboot整合
pom 增加依赖
<dependency>
    <groupId>org.springframework.boot</groupId>
    <artifactId>spring-boot-starter-websocket</artifactId>
</dependency>
新建配置类
@Configuration
public class WebSocketConfig {
    @Bean
    public ServerEndpointExporter serverEndpointExporter() {
        return new ServerEndpointExporter();
    }

}
一个实现聊天室的小 demo
@ServerEndpoint(value = "/websocket")
@Component
public class MyWebSocket {

    /**
     * concurrent包的线程安全Set,用来存放每个客户端对应的MyWebSocket对象。
     */
    public static CopyOnWriteArraySet<MyWebSocket> webSocketSet = new CopyOnWriteArraySet<MyWebSocket>();


    /**
     * 与某个客户端的连接会话,需要通过它来给客户端发送数据
     */
    private Session session;

    /**
     * 群发自定义消息
     */
    public static void sendInfo(String message) {
        for (MyWebSocket item : webSocketSet) {
            try {
                item.sendMessage(message);
            } catch (IOException e) {
                continue;
            }
        }
    }

    /**
     * 连接建立成功调用的方法
     */
    @OnOpen
    public void onOpen(Session session) {
        this.session = session;
        webSocketSet.add(this);
//        addOnlineCount();
        System.out.println("有新连接加入!当前在线人数为" + webSocketSet.size());
        try {
            sendMessage("当前共有" + webSocketSet.size() + " 位用户在线");
        } catch (IOException e) {
            System.out.println("IO异常");
        }
    }

    /**
     * 连接关闭调用的方法
     */
    @OnClose
    public void onClose() {
        webSocketSet.remove(this);
        System.out.println("有一连接关闭!当前在线人数为" + webSocketSet.size());
    }

    /**
     * 收到客户端消息后调用的方法
     *
     * @param message
     *         客户端发送过来的消息
     */
    @OnMessage
    public void onMessage(String message, Session session) {
        System.out.println("来自客户端的消息:" + message);

        //群发消息
        sendInfo(message);
    }

    /**
     * 发生错误时调用
     */
    @OnError
    public void onError(Session session, Throwable error) {
        System.out.println("发生错误");
        error.printStackTrace();
    }

    public void sendMessage(String message) throws IOException {
        this.session.getBasicRemote().sendText(message);
    }
}
前端页面,新建 templates/index.ftl
<!DOCTYPE HTML>
<html>
<head>
    <title>WebSocket测试 | 聊天小程序</title>
    <meta name="viewport" content="width=device-width, initial-scale=1">
    <link rel="stylesheet" href="https://cdn.bootcss.com/bootstrap/4.0.0-beta/css/bootstrap.min.css">
    <script src="https://cdn.bootcss.com/jquery/3.2.1/jquery.min.js"></script>
    <script src="https://cdn.bootcss.com/bootstrap/4.0.0-beta/js/bootstrap.min.js"></script>
</head>

<body>
<div class="container">
    <div class="row">
        <div class="col">
            <form>
                <div class="form-group">
                    <label for="comment">聊天框:</label> <textarea class="form-control" rows="5" id="text">你好啊</textarea>
                </div>
                <div class="form-group">
                    <button onclick="send()" type="button" class="btn btn-primary">发送</button>
                    <button onclick="closeWebSocket()" type="button" class="btn btn-danger">关闭</button>
                </div>
                <div>
                    <ul class="list-group" id="message"></ul>
                </div>
            </form>
        </div>
    </div>
</div>
</body>

<script type="text/javascript">
    var websocket = null;
    //判断当前浏览器是否支持WebSocket
    if ('WebSocket' in window) {
        websocket = new WebSocket("ws://localhost:8080/websocket");
        //连接发生错误的回调方法
        websocket.onerror = function () {
            setMessageInnerHTML("与服务器连接失败...");
        };
        //连接成功建立的回调方法
        websocket.onopen = function (event) {
            setMessageInnerHTML("与服务器连接成功...");
        }
        //接收到消息的回调方法
        websocket.onmessage = function (event) {
            setMessageInnerHTML(event.data);
        }
        //连接关闭的回调方法
        websocket.onclose = function () {
            setMessageInnerHTML("已关闭当前链接");
        }
        //监听窗口关闭事件,当窗口关闭时,主动去关闭websocket连接,防止连接还没断开就关闭窗口,server端会抛异常。
        window.onbeforeunload = function () {
            websocket.close();
        }
    } else {
        alert('Not support websocket');
    }
    //将消息显示在网页上
    function setMessageInnerHTML(innerHTML) {
        $("#message").append("<li class=\"list-group-item\">" + innerHTML + "</li>");
    }
    //关闭连接
    function closeWebSocket() {
        websocket.close();
    }
    //发送消息
    function send() {
        websocket.send($("#text").val());
    }
</script>
</html>
application.properties
# FREEMARKER (FreeMarkerAutoConfiguration)
spring.freemarker.allow-request-override=false
spring.freemarker.allow-session-override=false
spring.freemarker.cache=false
spring.freemarker.charset=UTF-8
spring.freemarker.check-template-location=true
spring.freemarker.content-type=text/html
spring.freemarker.enabled=true
spring.freemarker.expose-request-attributes=false
spring.freemarker.expose-session-attributes=false
spring.freemarker.expose-spring-macro-helpers=true
spring.freemarker.prefer-file-system-access=true
# 这是重点, 会过滤.ftl后缀的文件
spring.freemarker.suffix=.ftl
# spring boot 默认的页面模板存放目录
spring.freemarker.template-loader-path=classpath:/templates/
spring.freemarker.settings.template_update_delay=0
spring.freemarker.settings.default_encoding=UTF-8
spring.freemarker.settings.classic_compatible=true
spring.freemarker.order=1
新建控制器访问页面 index 即可
@Controller
public class Test {
    @RequestMapping("/")
    public String index() {
        System.out.println("----------");
        return "index";
    }
}
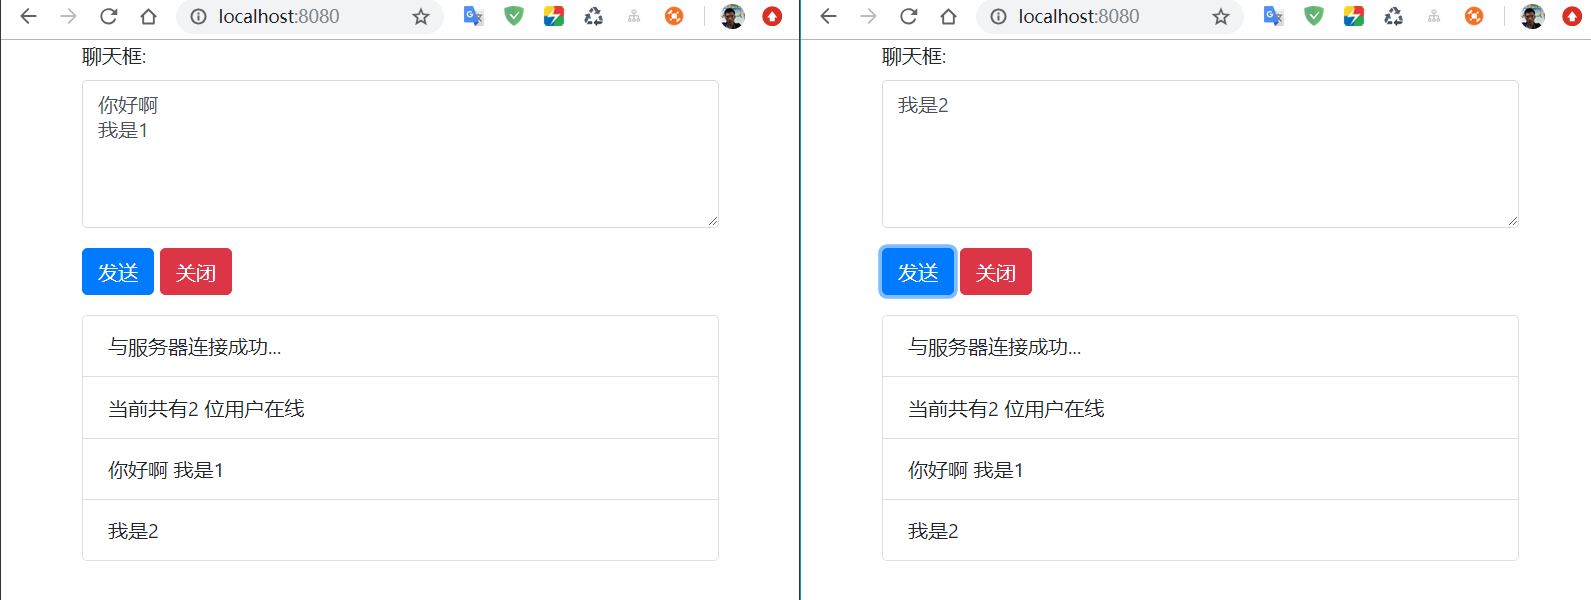
效果图

